Demonstration as a Reusable Training Manual
Learn how to turn a demonstration into a reusable training manual by matching written cues, visual sequences and replayable movement to learners’ needs.
The common mistake with a demonstration is treating one clear showing as a complete lesson. In a reusable training manual, that mistake costs learners the cues they need to recognise a correct action and decide what to do when their result differs.
A live demonstration, a written sequence and a recording each make different parts of a task available. There is no need to claim that one format replaced another: a manual can preserve instructions for later reference, while a person can respond to a learner’s question and a recording can make movement replayable. The design problem is to decide which details belong in each form.
What each format preserves
In a shared task, a learner can watch someone choose a tool, position a material and respond to what happens. The demonstration can pause for a question or return to a missed cue. Small acts may carry much of the instruction: the angle of a blade, the sound of a joint seating, or the decision to stop and inspect.
A written manual can name materials, set out a sequence and provide a reference after the instructor has left. It is less effective at conveying movement or sensation by itself. “Apply even pressure” is compact, but it leaves a novice to decide what even means.
A recording can show timing, hand position and the order in which details receive attention. Learners can replay it, but it cannot notice that someone is following the wrong hand or answer a question. An incidental habit may also look like a rule unless the presenter identifies it.
Make the cue visible
A demonstration can be accurate and still be hard to learn from when the instructor’s attention and the learner’s attention diverge. The instructor may concentrate on the material while the learner watches the tool, or pass through a critical moment without naming it.
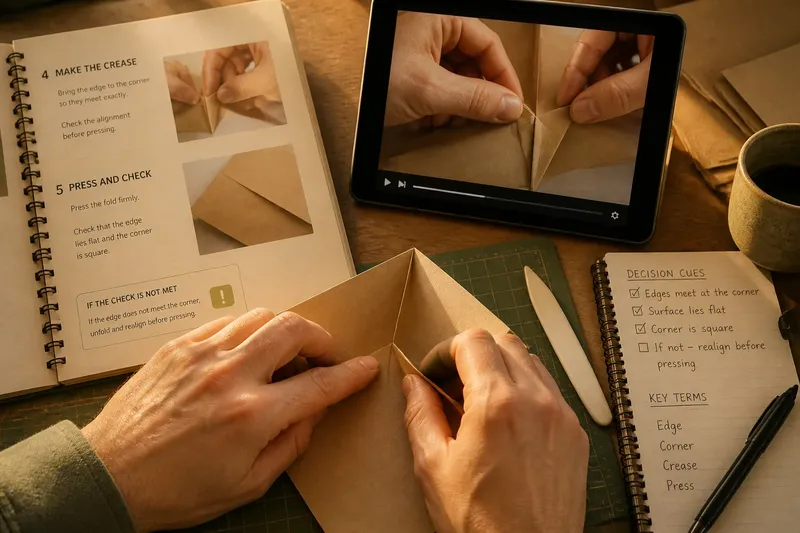
Before repeating the action, say what to watch for. Demonstrate slowly enough to make the cue visible, then show the sequence at its ordinary working pace. In a paper-box lesson, for instance, name the moment when the crease meets the corner, pause and point out the alignment before completing the fold. The learner can inspect that same feature in their own work instead of trying to imitate every movement at once.
Do not narrate every hand motion. A running commentary can bury the distinction that matters among trivial details. Explain the decisions that change the result; leave other movements visible without explanation unless learners ask.
Replace vague instructions
Words such as “smooth”, “firm” and “careful” may make sense to an experienced practitioner but tell a novice little about what to inspect. Often the missing piece is a reference point: the instruction names a quality without naming its visible sign.
Replace the adjective with an observable cue or decision. A sewing handout might say: press the seam with a finger until it lies flat, then check that the fabric has not gathered. The wording allows for differences in cloth while giving the learner something to look for. Add a close-up image when the cue is visual, and state what to do if the expected sign is absent.
Keep the sequence tied to the learner’s task. A manual that records every detail of expert practice becomes an archive, not a teaching aid. Put required actions in the main sequence and optional refinements in a separate note, so a beginner can see which decisions matter now.
Frame recordings carefully
A recording may preserve the instructor’s view rather than the learner’s. A wide shot can show the table while hiding the movement that determines success. A tight close-up can conceal where the tool sits in relation to the rest of the task.
Choose the view for the learning question. If orientation matters, show the workspace before moving closer. If finger placement matters, frame the hands and material without cutting off their point of contact. A pause or still frame can make a difficult moment available for inspection; captions can identify a term or decision without competing with the movement.
Do not edit away every pause. Retain a pause that shows the practitioner checking a result; remove dead time that adds no useful view of the task. Briskness is not a teaching objective in itself.
Keep formats aligned
A learner may find that a video shows one sequence while the printed guide gives another. This can happen when materials are produced separately or one version is revised without the others. The learner must then decide whether the discrepancy is an option or an oversight.
Give the demonstration, written directions and recording a shared sequence and vocabulary. Use the manual for steps and decision points, the recording for movement and timing, and live teaching for questions and variation. If a task has more than one sound method, state what differs and what remains constant.
Say you are preparing materials for a new library assistant who sorts returned books. The starting materials are a short written sequence, a recording of a cover inspection and a trainer available for a live session. First, agree on the same order of checks and terms across all three. Next, revise the recording so the spine label stays visible while the cover is inspected. Then add a written decision cue: if the cover is damaged, set the book aside for the designated review; if it is intact, continue to the shelving check. During the session, ask the learner to identify which condition changes the next action. The expected result is a consistent route through the task, with the damaged book sent for review rather than shelved automatically; the formats still serve different purposes.
Questions about manuals?
What belongs in a demonstration?
Show the actions and decision points a learner needs to recognise, especially those difficult to infer from the finished result. Keep routine movements visible, but explain the cues that affect what happens next.
Should a manual describe every action?
No. It should preserve the sequence, terms and checks a learner may need to revisit. Details that do not change the task can distract from instructions that do.
When is a recording more useful than live teaching?
A recording helps when movement, timing or orientation needs to be seen again at the learner’s pace. Live teaching suits questions and adjustments to an immediate difficulty; the formats can support one another.
How can a learner tell whether a step worked?
State an observable check beside the step, such as an edge aligning or a surface lying flat. If the expected sign is absent, give a clear next action or name the person or resource that can resolve the uncertainty.
Choose the lightest format
It is not worth turning every demonstration into a polished film or every spoken explanation into a page of prose. A well-framed still, a brief written cue or a careful live repeat may serve the learner better. Choose the lightest format that makes the important action visible and gives learners a reliable way to revisit it.
A reusable training manual earns its place when learners can find the relevant cue, see what words alone cannot show and know where to take a question the material cannot answer. Preserve the decision as well as the sequence: that is what makes a demonstration useful after the person giving it has left.